How Can We Help?
How to clean the bathrooms
- Powdered cleanser
- Toilet brush inside plastic cup
- Glass cleaner
- All purpose cleaner
- White scrub pad (scratchless)/magic eraser
- Shower brush
- Feather duster
- Whisk broom
- Floor cleaner
- Simple green
- 10 cleaning cloths
- Grocery bag for dirty rags
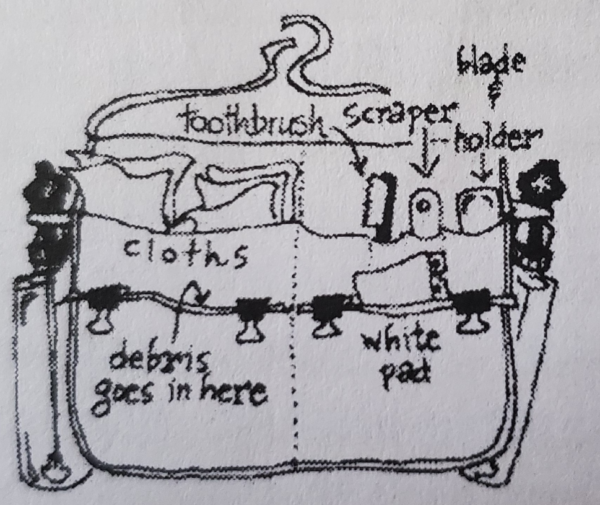
- 1 plastic scraper
- 1 small brush
- 2 plastic bags (with clips) – liners for your pocket
Step stool – 2 step
- Fasten your apron around your waist tightly.
- Make sure your small brush and other tools are in the correct pockets.
- Hang the glass cleaner and general purpose cleaner handles on the loops of your apron.
- Always use the same loop for the glass cleaner and the same loop for the general purpose cleaner.
- Be sure to always tighten and retighten spray bottle tops.
- All tools go in the same place every time, so you know exactly where to find them without looking.
- Stick your feather duster in your back pocket. Always wear pants with back pockets!
- The whisk broom goes in the other back pocket. Use it to brush dirt and debris away from vents, corners, and walls.
- Take enough cleaning cloths to make it all the way around. At first grab more than what you might need, with time you’ll get better at determining the exact amount needed.
- Place any throw rugs near the entryway or door. Be sure you take a mental picture of where they were as you will need to remember exactly where they go. If you are on a team, make sure to be the one that puts them back in the right spot.
- Make sure you lay them flat so that when you (or your partner) come by doing the floors, they can be easily vacuumed.
- Place the trash can just outside the entrance to the kitchen whether you are on a team or working alone. This will keep the trash can out of the way and also make it easier when it’s time to go around collecting the trash.
- Walk into the bathroom
- Place the cleaning tray to the right of the tub or shower. Look for areas that have built up grim.
- Pretreat the surface if needed. If there is no built-up dirt or grime in the shower or tub, you may skip this step.
- After pretreating the tub or shower, clean clockwise (left to right), never backtracking while carrying all the tools needed in the apron. You should be able to make it completely around the bathroom.
- Skip the toilet, you will do this last.
- Consider if it makes sense to go around the bathroom and dust all the items that require it, or complete this as you go around.
- Knockdown any cobwebs, check especially around doors and above the door frame.
- As you work around, be sure to look up on walls and down towards the floor.
- Wipe the baseboards – baseboards in bathrooms get extra dirty fast!
- Wipe any window sills.
- Dust any shelves and knick-knacks.
- Dust and wipe any pictures and picture glass.
- Dust towel racks and straighten towels.
If the shower or shower/tub combination is rarely used, it might need a quick spray and wipe with general purpose cleaner. For showers that are used at least once between cleanings, follow the steps below:
Shower walls
- Set items inside the edge of the tub or in the shower on the floor outside the shower.
- Remember where they go, set them aside in the same order to help remember their order when putting them back.
- Spray shower walls with general purpose cleaner, then wipe the surface dry. This usually works for up high in the shower or for showers not used often.
- For normal soap scum build-up, use the shower brush. You may need to add water and powdered cleaner for tough jobs.
- If you need to stand inside the tub or shower, stand on 2 rags. Otherwise, dirt will track in and out and create more work!
- For even tougher jobs, spray Simple Green and let soak. If you need to leave, start working on another area of the bathroom. If the shower doors need to pre-soak, be sure to spray them.
- Scrub the areas with the white pad/magic eraser, magic eraser or shower brush, whichever is most effective. The white pad/magic eraser will likely be best for smoother surfaces.
- When cleaning the shower or tub fixtures, use the shower brush, white pad/magic eraser, and small brush as needed.
- Use the “see-through” rule to know when to stop scrubbing. You should see the bare surface under all the mess. You should also feel the difference when you are scrubbing dirt and grime compared to a bare surface.
- Use the small brush to clean the soap dish. Spray general purpose cleaner only if necessary. Use the handle to scrape the soap. Then the bristle side to get the remaining soap out.
How to clean shower doors and runners
- After you have scrubbed the shower walls, move around to the glass shower walls and doors.
- Switch to the white pad/magic eraser for the shower doors.
- Do not wear rings that may scratch the glass! Nicking and scratching the glass with a diamond or hard metal could mean replacing the shower glass! Also never use a toilet screen or green pad on glass.
- If there is a shower curtain, skip it. Don’t attempt to clean it.
- Spray some general purpose cleaner on a white pad/magic eraser and wrap it around your plastic scraper. Slide it between the gaps in the doors. You can also use it for the runner. Use a cloth instead if the white pad/magic eraser is too thick.
Shower floor
- Wet the sides and bottom.
- Sprinkle just enough powdered cleanser to get the job done. You will learn the right amount over time. Be sure not to use too much. This causes waste and creates more work.
- For lighter jobs, use the white pad/magic eraser to scrub the cleaner in circular motions.
- For heavier jobs, use the shower brush to scrub the cleaner in circular motions.
- Use the “see-through” method to check progress as you go along.
- Use your small brush as needed for tight spaces.
Rinse the shower and tub once everything is scrubbed
- Turn on the water and begin rinsing.
- If there is a removable shower head, use that to rinse out the shower.
- If there isn’t one, use the shower brush or white pad/magic eraser to swish the water and move it to the areas that need rinsing.
- Or use a cup to fill it with water, and pour it on the areas that need rinsing.
- Start up high and work your way down.
- Once the walls are finished, work on the tub or shower floor. Start away from the drain and work towards it.
- It should look clean, but also feel clean when you rub your fingers against the surface. Do this to make sure all the cleaner has been rinsed.
- Move all the items that were in the shower or tub to their original location.
Glass on showers
- For glass showers, final touches on the glass will be last. Use your glass cleaner and spray the inside as needed. Wipe the surface with a dry rag.
- Be sure you are stepping on cloth rags if you are inside the shower. Otherwise, there will be footprints and extra work to clean those up.
- Move to the outside and use the glass cleaner to spray and wipe until it is clean and there are no streaks.
First, clean tough dirt off the sinks and faucets
- Check the level of dirt, does it need to be sprayed and wiped or does it need more than that?
- If it needs more than just a spray and wipe, wet the inside of the sink by running a little water, then proceed to use a tiny amount of powdered cleaner and the white pad/magic eraser to scrub areas around the drain and where there is grime.
- Rinse by running the water and using the white pad/magic eraser. Rinse powder residue from the white pad/magic eraser.
- NEVER use powdered cleaner above the bowl of the sink. This may leave scratches.
- Spray the faucet with general purpose cleaner.
- Use the small brush to get around the areas where the faucet meets the sink.
- Use the white pad/magic eraser and general purpose cleaner around the other areas on the top part of the sink around the faucet.
- Don’t wipe the sink and faucet area clean yet, this will happen after cleaning the mirror and countertop around the sink.
Next, mirrors above the sink area
- Light fixtures: Just above the mirrors there might be bulbs that are dusty. Try using the feather duster to knock off the dirt. If that doesn’t work, use the step stool to lightly wipe them. If a light wipe doesn’t work, leave them. Adding too much pressure will break them.
- Move items straight forward on the counter so you have full ability to clean the mirror. Place them so they go back exactly where you found them and gives you just enough room to clean the counter behind them.
- Use glass cleaner and a dry cloth.
- Spray lightly and evenly.
- Wipe with the dry cloth until it’s completely dry.
- If you don’t wipe completely dry, it may leave streaks.
- Place the glass cleaner in the correct loop on your apron.
- Be sure to wipe the top of any medicine cabinets. Never open the door or clean inside.
- TIP: If you spray more glass cleaner than you need, it takes longer to clean. Spray lightly, don’t overspray.
- TIP: Never wash cloths meant for glass together with any other cloths. Residues, especially from furniture polish may stick and leave glass looking hazy and streaked.
Wipe down counter and finishing touches on sink areas
- First, wipe behind the items on the counter that were moved forward in the previous step.
- Wipe down each item and move them straight back to their original location.
- Wipe down where they were and work to the front.
- Move left to right repeating the same steps.
Always do this last. Never use a rag to clean a toilet and then use it on something else. The rags used to clean the toilet go straight to the dirty rag bag. Be sure to wear gloves while cleaning the toilet.
Inside the toilet bowl
- Flush the toilet first.
- Dip the toilet brush in the water, then sprinkle some powdered cleaner on the bristles.
- Scrub inside the entire toilet bowl, including under the rim.
- For tough stains, use the toilet screen to scrub them out.
- Flush the toilet again.
Outside of the toilet
- Start with the toilet lid and seat in the upright position.
- Spray under the seat, then lower it.
- Spray under the lid, then lower it.
- Spray the top of the lid and the hinges connecting it.
- Spray and wipe the top of the toilet and start working down the sides and front of the tank.
- Wipe the top of the lid including the hinges. Use the small brush to clean tough to reach areas around the hinges.
- Raise the lid and clean under it. Wipe down hinges again and use the small brush where needed.
- Wipe the top of the seat, then raise and clean under it. Use the small brush as needed. Brush and wipe the hinges again.
- Wipe the top of the toilet bowl and down the front, sides, and behind the toilet. Clean the entire surface from the top of the bowl, all the way to the floor.
- Be sure to clean around the plastic caps with your small brush and wipe around.
Floor around the toilet
- Spray the floor around the toilet, including behind it, with general purpose cleaner.
- Wipe down while on your hands and knees. Some of these areas are difficult or impossible to clean any other way.
This is a bathroom that may be rarely used. The cleaning technics for this bathroom are different. Some areas may need to be dusted or just quickly wiped. Don’t scrub if there is no dirt to scrub!